Thursday, December 28, 2017

Fantastic Post-Christmas Chocolate Find: Peppermint Dark Chocolate Truffles

Did you find nearly no treats in your stocking this year? This happens sometimes. You get socks, books, scarves, gloves, but no sweet treats. This particularly happens to me because my friends and family don't know what kind of chocolate to buy a chocolatier-slash-chocolate maker for Christmas. And the kind of chocolate that I like (bean-to-bar, craft chocolate) is not made or sold by anyone other than me in Northern Ontario. But if you are like me, and still appreciate a good store-bought truffle, or meltaway, and you LOVE peppermint and natural ingredients, then you will like this fantastic find I discovered at Bulk Barn yesterday: Peppermint Dark Chocolate Truffles by Splendid Chocolate.

 
There are eight 'truffles' (technically they are 'meltaways' since the truffles are made with coconut oil rather than fresh cream, like a Lindor Truffle) in the box and only a few ingredients, including semi-sweet dark chocolate (sugar, chocolate liquor/cocoa beans, cocoa butter, soy lecithin and vanilla extract), coconut oil and natural peppermint flavour.  It was only $3.99!  I assume this was a sale price after Christmas, because with a price that low regularly, I'd soon be put out of business.


The chocolates are made by Splendid Chocolates Ltd. in Montreal. Learn more about the maker at: www.SplendidChocolates.com. You can buy them at Bulk Barn. For more information on this retailer, visit www.bulkbarn.ca.

Happy treat eating!

***

Note: I didn't get paid or receive anything to write the above post. I just really enjoyed those truffles and wanted to tell you about them!

Sunday, December 24, 2017

Decorating a Chocolate Cake for Christmas, and a Moist Chocolate Cake Recipe!

I rarely take cake orders these days, not because I don't like making cakes, but mainly because I love making chocolate and confections, which has squeezed out any time for cakes. But every now and then I let someone talk me into it, especially when they say things like "I want it to taste chocolaty, to look chocolaty, and a little bit Christmas-y." Well, that is my kind of chocolate cake lover, and that I can do.


Last week, I made just this kind of wedding cake for a customer.  It included layers of moist chocolate cake, using a recipe I haven't used in a while, from a photocopy of a cook-book I don't remember, but certainly was still delicious. I modified the recipe over the years in several ways, once by accidentally leaving out half the flour, and the result was a much moister cake. I have included the modified recipe below so you can make one too.  The icing was a rich buttercream with raspberries mushed and swirled into it. And the topping was a thick semi-sweet mouth-watering chocolate ganache. The overall pairing of the raspberries and the dark chocolate, with layers of cake is quite yummy.


If you want to make a similar cake, first make the chocolate cake in layers. TIP: It is easier to pour just a little cake batter in the bottom of a cake pan and bake for only 10 minutes, which you repeat a few times, rather than pouring all the batter in and baking for 25 or 35 minutes and then having to slice the cake in layers and cut off the rounded top.
 
Beat thawed and mushed - or fresh and mashed - raspberries into your favourite vanilla buttercream recipe, then layer between the cake layers. Cover the whole thing in dark chocolate ganache. Make sure you double everything to get enough, or you'll be making second batches of icing and ganache.
 
Find some Christmas tree moulds at a local cake decorating or baking supply store, and half sphere chocolate truffle moulds. Also, buy some edible glitter (I have copper and bronze). Use a small, dry paint brush to brush it on your chocolate spheres. You can either paint the mould first before filling it with melted, tempered chocolate, or after the sphere is made. Check online shops like Golda's Kitchen for moulds.
 
Make additional ganache and let set at room temperature for 6 hours, or on the counter overnight. You can pipe it through a cake decorating bag with a tip for rosebuds to decorate the sides or top of your cake.  The chocolate ribbon seen in the pictures here is a secret recipe of mine, but chocolate rolled fondant, which you can also buy at a local baking supply store, would enable you to make ribbon for your cake. Or you can just pipe chocolate ganache onto the cake around the base and second tier, or in any way you like.


You can also paint your chocolate Christmas tree with a bronze or gold edible glitter. In the case of the tree, it is best to sprinkle the glitter or gold dust into the mould before pouring in your melted and tempered chocolate.
 
 
Enjoy your chocolate raspberry cake creation! Below you will find the recipe for the chocolate cake. 
 
 
Merry Christmas to all, and to all a good night! :-)
 
 
Moist Chocolate Cake Recipe
 
You need:
1/4 cup oil
1/2 cup organic muscovado brown sugar (this is real brown sugar, where the molasses has not been processed out of it and added back in, like the standard grocery store stuff).
2 large eggs
1/2 cup all-purpose flour
3/4 tsp baking soda
1/4 cup cocoa powder
1/2 cup sour cream
 
Instructions:
  1. Preheat the oven to 350º F. 
  2. Prepare three 8" cake pans with rounds of parchment paper (if you only have one or two, just cut the extra round of parchment and set aside to bake the additional layers after you have popped your baked cake layers out of the pans you have). Butter under the parchment to stick it down to the bottom of the pan, then on top of the parchment and up the sides of the pan with melted butter (or lard or coconut oil).
  3. Place the flour, cocoa powder, sugar, and baking soda in a bowl. Stir well until combined. Add the eggs and oil and beat in with a whisk or beater for a few seconds until just combined (no longer). Gently stir in the sour cream.
  4. Pour one-third of the batter into your prepared cake pan (or one-third into each pan if you have three). Spread around with a spoon to cover the entire pan.
  5. Bake 10 minutes. If a knife inserted into the centre does not come out clean, and the cake is not puffed in the middle, bake another 2 minutes until cooked.  Run a knife around the edge and after 10 minutes of cooling time, place a serving plate or waxed paper over the pan and flip over onto the counter or a cooling rack. Let cool to room temperature before icing the cake. Scrape the parchment, grease your pan and bake a second layer if you don't have enough cake pans for three layers.
 
Tips for perfecting a crowd-pleasing cake:
  • Ice between the layers with milk or dark chocolate ganache (see below for recipe), whipped chocolate ganache (cool your ganache to room temperature then beat it with a hand-held beater), buttercream icing or no-bake cheesecake batter.
  • Ice the outside of the cake by pouring warm chocolate ganache over the centre of the layered cake and let drip over the sides. Let cool a few seconds then spread around the sides with an offset spatula. This takes a little practice to get it right, but you'll quickly learn how long to let cool before you can manipulate the ganache to make the cake look how you want.
  • If your sides are not smooth, press chocolate shavings into them. This adds an extra-chocolaty kick! (and an extra expense, so keep that in mind).
  • Double, triple or quadruple this recipe as needed depending on the size of your cake (i.e. 12" pans will need it to be doubled at least, quadrupled if you want a tall six-layer showpiece cake).
 
Dark Chocolate Ganache Recipe:


Place 2/3 cup whipping cream in a microwave safe bowl with 8 ounces of dark chocolate (chopped into 1/2" to 1" pieces). Microwave for 1 minute. Remove from microwave and stir until smooth. If there are still chunks of chocolate, microwave for 10 more seconds, then stir until smooth. Add a tablespoon of agave, honey or corn syrup for shine and stir in. Pour over cake immediately, or let set for 6 hours on the counter, then spread in between cake layers (may need to double the recipe if you are doing a three-layer cake) or whip for added volume. You can also use the set ganache to pipe rosettes onto the cake for decoration.
 
This is another example of a chocolaty-looking cake that I made on Friday.
The raspberries are beaten into the buttercream for the pink colour and raspberry taste,
which was then applied on top of the chocolate glaze/ganache. There is a raspberry pie
baked in the centre (in this cake, half the cake batter was poured in the bottom
of the pan, the pre-made and pre-baked raspberry pie is placed on top of the batter
(inside the cake pan) and the remaining batter is poured on top.
Then the cake is baked for at least one hour.
For more info and recipes for Piecakens go to www.piecaken.blogspot.com.
 

Thursday, November 30, 2017

The Chocolate Maker's Unconference & The Northwest Chocolate Fest: THE place to hone your craft

Learn. That is something we must continually do as chocolate makers. Learn about the beans and their processing, learn how to identify the taste of good processing and bad simply in a single bite, learn about the best equipment to make chocolate, learn how to better temper, package and sell our chocolate. Learning is an ongoing process and the best way to do that is to learn from other chocolate makers. And that is exactly what happens at the Chocolate Maker's Unconference annually in Seattle.

Um, can we say chocolate super-hero? This is Chloé Doutre-Roussel,
who is THE reason behind many chocolate makers love for tasting cacao
and fine chocolate. She wrote the little pink & black book called:
The Chocolate Connoisseur that many of us 'chocophiles' keep
within arms' reach on our book shelves.


I was amazed last year at how much knowledge I gained. And again this year I absorbed more knowledge in two days than during the previous nine years I've spent researching and writing about the chocolate industry. Working with chocolate and making chocolate, as I have for many years now, is truly a wonderful way to learn. But there is a magic that happens at the Unconference that cannot easily be explained. The openness of the chocolate makers, who are really competitors in a business sense, continually amazes me. They collaborate, share ideas and business practices, and arrive with good intentions to help others, while also taking in a slew of chocolate making tips to better their own craft.


Chocolate makers who just started up, and chocolate makers who've been building brands and businesses sat in the same room learning new things.  Sessions were attendee-driven, topics pre-decided based on the conference goers themselves. There was a session for everyone, and each one an open forum for ideas. The 'law of two feet' also helped anyone who found themselves in a session that was not a good fit, and so anyone could get up and move to a different session without judgement.

There was a lot of time for discussion and learning
between chocolate makers and industry professionals at the Unconference.

The conference also gives us chocolate makers and chocolate researchers, writers, etc. a chance to 'talk chocolate' for 2 days straight. Something we don't often get at home, for those of us with no staff or family members in the same business. It enables us to freely 'think aloud' about things we have only internalized all year long.  Or perhaps for those of us who don't have the time to be online communicating with other chocolate makers as often as we like. At the Unconference, we can leave the roasting, winnowing, grinding , dipping, moulding and all the dishes behind and just focus on the beans, the learning, and the tasting (oh, did I mention we tasted chocolate on both days this year? YES.)


So if you are a chocolate maker, whether new to the industry or a veteran who wants to find new ways to run your business, plan to attend the Unconference next in year in Seattle. Granted November is a stressful time of year for most chocolate makers, it can give you a chance to relax, breath and tackle the Christmas season with a fresh outlook on your business, just in time for the January lull where you will have time to apply the ideas and learning that you take away from the Unconference.

And you can then attend the Northwest Chocolate Festival, where you can create a stir by selling your goods, or by simply buying stacks of chocolate that will inspire you. Below is just some of the stash I came away with from this year's NW Chocolate Fest.


Over the next few weeks, and perhaps months (let's face it, my chocolate making and confection business has been getting in the way of my blogging time recently), I will be telling you about some of the chocolate and makers that I found this year at the Chocolate Maker's Unconference and Northwest Chocolate Fest. And I will try, more often, to share some of my learning and recipes. And tune in to Instagram (@ultimatelychocolate), Twitter (@ultimatelychoc) or Facebook for past pics of the NW festival, plus future pics of what I am tasting and making, as well as doing with my leftover cocoa husks this holiday season. So stay tuned!

A lot of chocolate was for sale at the NW Chocolate Fest
as well as art work, gifts and books about chocolate!


Monday, November 6, 2017

The Northwest Chocolate Festival and The Chocolate Makers Unconference, in Seattle this week!

I am super excited because this week marks a year since I attended the Chocolate Makers Unconference and the Northwest Chocolate Fest for the first time. And guess what, I am headed back there again this year! 

If you are chocolate lover, the Northwest Chocolate Festival is THE place to be on November 11th and 12th in Seattle. Hundreds of craft chocolate makers are selling their delicious chocolate bars, drinking chocolate, truffles, confections and more. Also, amazing gifts for Christmas can be found at the festival, such as jewelry, purses and art. And all sorts of workshops and presentations are taking place, which will help you learn more about chocolate, cacao and craft chocolate.


This is my 'haul' of chocolate bars that I brought home from the festival last year!
 
For my fellow chocolate makers, all the equipment and tool suppliers will be there. And at the Unconference on the 9th and 10th, we will learn from each other how to expand our businesses, market our products, and deal with suppliers. It is a great learning experience for new chocolate makers, as well as medium-sized ones who are looking to grow. It is also the perfect event for tasting chocolate! Last year we tasted a crazy number of chocolate bars, all brought by chocolate-making attendees, and this year we will be tasting over a two-day period (so as not to overwhelm our taste buds). It is a great way to generate ideas, while respecting the innovation of fellow chocolate makers around North America and worldwide.


This is just one of the six or seven tasting tables at the Unconference last year.


If you want to learn more, you can read my post-event article about the conference and festival last year here: http://ultimatechocolateblog.blogspot.ca/2016/11/the-chocolate-makers-unconference-and.html
Or you can visit the Unconference website here:  https://www.chocolateunconference.com/.
Or the Festival Website here: https://www.nwchocolate.com/.

See you in Seattle!

Wednesday, October 25, 2017

Dark Forest Chocolate; a Delicious Surprise Delivery

 
Dark Forest Chocolate bars just arrived in my mailbox, thanks to my wonderful always-traveling Kerry (aka The Chocolate Doctor). Kerry must know what I like by now, because I loved all three chocolate bars that came in the package. I liked them so much that I wanted to mention them here on this blog. 

The chocolate bar I started (and finished) first was a delicious 82% dark blend bar made from cocoa beans from both Costa Rica and Ecuador mixed together, to create something both fruity and nutty. This chocolate captivated me and I couldn't stop myself from going back for more until it was all gone.

The second one that I tackled was the 50% Milk Chocolate - a dark-milk bar with both a creaminess and bitterness that appealed to me. It is made from Trinitario-type Costa Rica origin beans, and it won a bunch of awards this year. If you read this blog often, you'll definitely know that I love dark-milk chocolates, and this one certainly stood out. It was lovely, and a chocolate that I would eat again.

The third - a Salted Malted milk chocolate bar - was so yummy that I had to hide it in the cupboard from myself. Reminiscent of malted milk chocolate eggs from the Easters of my childhood, but with a dark-milk component. The salt added a lovely kick in the aftertaste. Truly an addictive chocolate for any kind of chocolate lover. New packaging was just launched for bar, and if you look at Dark Forest Chocolate's website, you'll see that it is super cool and colourful.

Dark Forest Chocolate makes their chocolate from bean-to-bar in Lancaster, New York. You can buy their craft chocolate bars in their storefront at 11 W Main Street, or online. They have over a dozen different flavours. Check them out today!

Friday, October 6, 2017

Secret Chocolate Maker's Tasting at Soma was the BEST DAY EVER

I often feel a little stuck on an island. I suppose that is because I live and work on beautiful Manitoulin Island, and am usually tucked away in my commercial kitchen, to busy to get out and see the world. But a few weeks ago, I zipped off to Toronto (and by zipped off, I mean I drove for 7 hours straight) because I needed to get away. AND because Soma Chocolatemaker was hosting a 'Secret' tasting at their closed-to-the-public chocolate factory. Sure, I'd been to both Soma retail locations before - in the Distillery District  and on King St. in Toronto - but I had not yet seen where the chocolate-making magic happens. So I decided to get off this island, and get my butt down to Toronto to meet my chocolate super-heroes.

A cacao pod, a cocoa bean 'guillotine' for cut tests
of sample beans, plus Soma's Mango Chili bar! See below for
more details on that deliciously fruity bar.


Magical, it was.

I want every person that I know to experience Soma chocolate. David Castellan and Cynthia Leung, the company owners, have created many unique chocolates over the years, with quality and taste in mind. And they continue to seek out new cocoa beans with distinct flavours, and beautiful stories, as well as dream up innovative new chocolate experiences.


David Castellan placing cocoa beans in the 'guillotine' in preparation
for the cut test to check fermentation and quality of the beans.
David is one of the original North American masters of bean to bear chocolate.

During the presentation, David led us through a cut test to test new cocoa bean samples they had received from India, Peru and other far-off destinations. We passed around cocoa beans to smell, taste and learn about. And he lead us through the process of chocolate making within the context of their factory. The vintage winnower, originally from the Lindt factory, was about the biggest thing I've ever seen, although the additional tour I had through the factory showed me just how much room can be needed for chocolate moulding machines. It seemed like a dream, since I still mould all of mine by hand and from a rather small bowl. Ahem, we'll say the moulder was larger than my entire commercial kitchen.

Soma's chocolate moulds loaded into the
monster-of-a-moulding machine.


While at the tasting, I was not disappointed. In fact, I am even more in awe of how Soma has organically grown and become this amazing, world-renown chocolate maker over the years. A chocolate maker can grow but become stale over the years, as we've seen with commercial grocery-store chocolate, where you can't look at their products in stores anymore because you've already tried every flavour a million times before. But not Soma - they keep us chocolate tasters on our toes, always anticipating their next new origin, or newest chocolate innovation.

Aging blocks of chocolate in Soma's factory.


So once the new factory is up and running, I think more tastings will be possible. Which is an experience everyone should have. Follow Soma on social media now and follow their story as they grow further and move into their new factory space!


Cynthia Leung with me at the tasting!
This amazing and beautiful lady (her, not me) is full of
innovative ideas when it comes to chocolate treats.
Her passion about chocolate and using real ingredients
is clear in everything she says and does.

So What About the Chocolate?

Of course I brought back several chocolate bars from the factory. A mini pop-up shop was available at the end of the tasting, and while I shared my chocolate and talked 'beans' with Cynthia and David, my best friend made my purchases for me (I paid her back of course!).

The New Fiji Bar is a creamy chocolate, and very complex with layers of flavour.  It has the aroma of a sweetened iced latte and plums, but in terms of flavour there is an earthy 'green' flavour, perhaps a little olive and the slightlest dryness of the outer part of a nut, like a walnut, but not quite that strong - perhaps a pecan - which lingers.  The lovely earthy taste also lingers for a bit with a bit of plum fruit taste, then ends suddenly, but leaves your mouth watering for more.  Soma may have entirely different tasting notes on their package, but I didn't see them since my bar was freshly sealed into its inner package only. My interpretation was that the Fiji bar is complex and delicious.


Soma's new Fiji bar, soon to be released!
Amazing new packaging also coming with it,
so keep your eyes peeled for this new Soma offering.

The recently introduced Soma Colombia 'Arauca' chocolate bar is also a 70% dark chocolate, and has a lovely immediate bright flavour of honey and mild fruit in the form of nectarines, perhaps mandarin. I have been receiving a lot of samples of Colombian cacao recently, and there seems to be a very common theme of honey notes in the chocolate. This bean by far is the most complex I've tasted out of Colombia and quite unique. It is delicious.

 
I also picked up the 2016 Gold-winning Soma Porcelana chocolate bar. This is a very limited edition bar made from the very rare cacao grown a region south of Lake Maracaibo in North-West Venezuela. I've now purchased a good percentage of the limited number available, and I still never mind paying the $18 retail price. The chocolate is so mild and delicate, creamy with the actual taste of light coffee cream, and very mild roasted nuts, that it continually surprises me at how opposite-to-bitter this dark chocolate is. The beans would make a beautiful 100% dark chocolate, but with sugar they certainly can have a greater reach.  Get one while you can because this may be the last of the batch, and with the situation in Venezuela, this may be the ONLY batch!

The BEST new creation, or should I say 'innovation' by Soma is the Mango Chili bar, with a hint of lime and sea salt. I have told you about Soma's beautiful Raspberry bar before, but the Mango bar is relatively new and just as full of fruit flavour. The Chili and salt cuts a little of the sweetness, making a perfect balance of sweet and savoury. This chocolate bar also has no milk in it, so lactose intolerant folks can rejoice! All I can say is: you MUST try this chocolate bar.

 
I brought home other treats as well, like some delicious cocoa nibs tumbled in dark chocolate and the milk chocolate version of the oh-so-crunchy Soma Old School bar, which I always love to enjoy. 

Haven't experienced Soma's amazing chocolate yet?
If you haven't had the opportunity to experience Soma, it is time you do! You can buy online, or find Soma around the world now in all sorts of specialty retail shops. Check my list for shops, or any retailer of bean-to-bar chocolate near you.

Thursday, September 14, 2017

Need an easy way to temper chocolate? EZtemper is the BEST tool on the market for small batch chocolate.

The EZtemper is the most helpful tool on the market for chocolate makers and chocolatiers. It was designed by my friend Dr. Kerry Beal (aka The Chocolate Doctor). She's a real-life doctor (in fact, I had an appointment with her before I even new about her 'other' life as a chocolate expert!), as well an amazing chocolatier and all-around chocolate guru. She is Toronto-based, and every summer makes the 7-hour drive up to Manitoulin Island to work in our hospital and medical centres. That is how I came to know her, and was certainly surprised when I saw her demonstrating chocolate truffle making at the Toronto Luxury Chocolate Show several years back! Since then, we have a visit each summer when Kerry is on the Island, and she has taught me all sorts of great chocolatier tricks and techniques. And she introduced me to the EZtemper, for which I will be forever grateful.


This is Kerry, the Chocolate Doctor!
 
Since I make chocolate in very small batches (yes, I still use bowls over a double boiler), I found tempering to be tedious and frustrating. Now, it is quick and saves me SO much time since I started using the EZtemper.

Sometimes I have to temper very small bowls of chocolate, just to do a little decoration on the top of my confections. The EZtemper makes this very quick and simple. Other times, I am tempering large bowls of chocolate (2,000+ grams) and the EZtemper also instantly tempers the chocolate, and lets me re-temper the chocolate quickly when it begin to thicken too much to continue working, without the tedious method of heating and cooling over ice or marble slab.

This is a very small batch I might occasionally work with
- just enough chocolate to make a squiggle on top of the confections.
Can you imagine tempering this amount of chocolate by hand?!?

For bean-to-bar chocolate makers, this is great (unless you are a two-ingredient/no-cocoa-butter added chocolate maker). It gets your small batches tempered quickly and you can move on faster to the packaging stage.


How does the EZtemper work?
For those who understand that cocoa butter crystals are basically science, the EZtemper keeps little containers of cocoa butter in a constant state of 'silk', where it is not liquid nor solid. In fact, it looks like softened butter when it is pulled out of the EZtemper. If you have ever tried to do this over the stove or in the microwave, silk is not easy to make. It is possible, but it would take you an hour to get some ready.

With the EZtemper, you simply take your silk out of the machine, add a dash of cocoa butter (1% of your batch size, to be exact), and stir it in to your chocolate, which just needs to be melted to 33.5ºC or a little less. Bam! Your chocolate is instantly tempered! You still need to do a little test to be sure your thermometer was not off, or your measurement was good, but for me, the chocolate is perfectly tempered nearly every time.

You can also do this with ganaches and meltaways - the batch just needs to be a bit cooler (around 25ºC or so) when adding the silk.


What does the EZtemper cost?
The machine is about $1,000 US, which to me, is worth every penny. It has saved me so much time this last year, and really increased my level of production. Also, it is so easy to use that my summer student was able to learn to temper chocolate perfectly in just her first few days. And I find now, that I can't live without the EZtemper. I can still hand-temper chocolate, but why would I need to waste all that extra time when I have this incredible tool on my counter waiting to be used?

Where can I buy the EZtemper and learn more about it?
Visit www.eztemper.com for more information or follow on Instagram at @EZtemper.
 
 
This is me, in a very fun apron, with my beloved EZtemper.

Note: I was not compensated or paid in any way to write this post. I realize it reads like an advertisement, but that is just my pure excitement over this incredible chocolate-makers tool.

Wednesday, August 30, 2017

Delightful and Decadent Seasonal Truffles: Basil & Dark Chocolate Truffle Recipe

The basil has been growing in abundance in the back garden all month long and I have been inspired.  My first introduction to basil in chocolate by Hello Cocoa last month was the first inspiration, and then the fact that it was growing everywhere, I just couldn't help myself. I had to make basil-favoured chocolate truffles!


So get outside and pick the last of your basil now before it goes to seed, because this is your chance to make something absolutely delectable! These truffles are both bitter and sweet, a little sweet and savoury, and sooooo creamy.

My recipe is a modification of Alice Medrich's mint truffles from her first book, 'Bitterweet'. I found the basil to have a milder taste in the resulting truffles, so instead of loosely packing the leaves, pack them in tight to your 1 cup measure to maximize flavour.

I also made a second version of these, rolled into balls and dipped in dark chocolate, and immediately rolled in sesame seeds. The crunch was delicious! This is also a great way to cover up any chocolate-dipping imperfections, in case you are new to working with chocolate.

Basil chocolate truffles rolled in sesame seeds.


Basil & Sesame Dark Chocolate Truffles Recipe


Plan ahead: Remember to start two days in advance of when you want to make the truffles!

Ingredients:
  • 20 ounce (567g) semi-sweet dark chocolate (I used 56% Camino couverture chocolate, with just three ingredients of cacao, cocoa butter and organic sugar)
  • 360 ml (1.5 cups) whipping cream
  • 1 cup packed fresh basil leaves
  • 20 ounces (567g) dark chocolate (I used 70% organic/FT couverture chocolate) for dipping
  • Dried basil for decoration
  • Light sesame seeds for decoration or rolling
Instructions:
  1. Two days in advance: pick your basil, measure to 1 packed cup, then soak in the cream in a small saucepan with a lid. Warm this on the stove and bring to a near-boil. Let cool then refrigerate covered for 24 hour to let steep.
  2. After 24 hours, remove from the fridge. Heat on stovetop at medium temperature.
  3. Chop the chocolate into 1/2" pieces and place in a heat-proof, medium-sized bowl.
  4. When the cream comes just to a boil, remove from heat and pour over the chocolate in a circular motion to ensure you touch all the chocolate in the bowl.
  5. Stir with a clean wooden spoon slowly in a circular motion until all the chocolate is entirely melted and smooth with no chunks or smalls solid bits left. Try to keep your spoon touching the bottom of the bowl the entire time you are stirring, to prevent excessive air bubbles. Set aside for a moment while you prepare your frame.
  6. Pour into a small chocolate frame (about 8" x 8"), or a plastic-wrap lined small box (like a shoebox or anything rectangular like a loaf pan about 9" by 4". If you just want to roll truffles, and not make square shapes, just pour into a bowl.
  7. Cover the frame, box or bowl and set aside until set (usually 8 hours or overnight, when resting at a room temperature of not more than 21ºC or 22º C.
  8. Once set, begin melting your dipping chocolate in a double boiler (do not let even one drop of water touch the chocolate!). Temper the chocolate following the instructions at this link: http://ultimatechocolateblog.blogspot.ca/2014/04/there-is-more-than-one-method-to-temper.html.
  9. Cut your set truffle into 3/4" squares using a sharp, long knife. Or roll into 3/4" balls between the palms of gloved hands (kitchen gloves will help prevent your body heat from melting the chocolate, and it is more hygienic).
  10. On a fork or chocolate-dipping fork, dip into the melted and tempered chocolate, let excess drip off and then set gently onto waxed paper. Sprinkle a little dried basil or sesame seeds on the corner of the squares or top of truffle balls, or roll entirely into sesame and dried basil. Let set on waxed paper for 30 minutes or so and place in mini cupcake papers or candy papers.
  11. Consume within 10 days or to freeze: place in a container with an airtight lid and freeze for up to 6 months. Let come to room temperature before you open the container to serve.
Feel free to try this recipe with any other herb or mint leaves for fun flavour combinations.

Enjoy!

Monday, August 21, 2017

For the Cacao Adventurer: Crayfish Bay is the Place to Stay!

It's now August and I am still dreaming about my trip to Grenada last May. And when I am thinking about Grenada, the spot that comes to mind most is Crayfish Bay. I want to go back! I want to spend more time. I want to help on the farm. I want to stay in their 'Little House', a rental overlooking the Caribbean Sea. And I want to eat more of the chocolate made on the cocoa farm. And I certainly want to hang out with Lylette and Kim Russell some more.

That's me! On the farm - at Crayfish Bay Organic Estate Grenada.

So who are Lylette and Kim, you ask?  They are the amazing couple who run the Crayfish Bay Organic cacao farm and the onsite, tree-to-bar chocolate factory. Located on the North-West Coast of Grenada, this 15 acre estate is idyllic, and certainly full of flavour. Mango, citrus and nutmeg trees greet you at every turn, and the cacao is simply everywhere.

Kim and Lylette Russell, Owners of
Crayfish Bay Organic Estate & Chocolate Company

While I was at the Grenada Chocolate Festival, I had the opportunity to visit the cacao farm on two separate occasions. The first day was to show us how Lylette and Kim are making chocolate 'on a shoestring' budget. Kim built his own cocoa bean roaster, and many other pieces of equipment to make chocolate with. And Lylette self-taught herself in chocolate making, including how to temper chocolate, and to turn their beautiful and very tasty cocoa beans into a gorgeous 75% dark chocolate. They started small, and stayed within budget, and eventually built up to a point where they could buy a larger chocolate refiner. They have already increased the profit earned from the estate by making chocolate from the beans, and they have a goal of using 100% of their beans in their own chocolate.


From roasted cocoa beans, to cracking, winnowing
and chocolate making, Kim and Lylette did it all on a budget.

During the second visit, our group was able to 'help' on the farm for the day. The farmers took us out and showed us how to pick the cacao from the trees, crack open the pods and pull out the cocoa beans and pulp from inside. I could see how the work could be tiring, but I think I was on too much of a cocoa bean high to notice. The excitement by everyone in the group was visible in every stage of the day. People were taking selfies on piles of cocoa pods, laughing and smiling, and exclaiming with excitement when they found a 'juicy' pod, and sharing with others to eat the delicious pulp (sorry Lylette and Kim, I think we ate a good chunk of your profit that day!). It truly was a wonderful experience.


This pic was taken of me (and friends like Karine (Miss Choco)
by the amazing photographer at the Grenada Chocolate Fest.
See it on the festival Facebook page by clicking here
.

Taking the beans and pulp out of the pods was very serious business.
This pic came from the Grenada Chocolate Festival.

Afterwards, we ate a delicious lunch made by Lylette and Kim, and enjoyed chocolate cake (made from a Crayfish Bay product: pre-formed balls of organic cacao & sugar that you can buy when you visit the farm). We also indulged in a chocolate tasting. Grenadian rum was also a part of the deal and some yummy cocoa tea (made from a combination of cocoa husks and nibs).


The taste of the chocolate...
Upon opening the last package of chocolate, these two months later, the chocolate smells to me like roasted plums and berries. And as I take a sip of coffee after a bite of the chocolate, the chocolate washes away and a mild charcoal roast taste lingers in my mouth. I am happily in dark chocolate heaven. This chocolate is potent, and there is a distinct fruitiness to the taste, with strong earthy flavours and some distinctive acidity that lingers. The roast is certainly a dark roast, which may have some slight variations among bars, since Kim demonstrated his method of listening to the beans to learn when the roast is done.


The colour is almost a milky-red shade of brown, rich mahogany. When I made a 70% from the same beans grown on the Crayfish Bay farm, the shade was even closer to a dark-milk chocolate. I love these beans and I love the chocolate that they make!


I made my own chocolate from Crayfish Bay beans...
I asked Kim if I could buy a 5 lbs bag of beans from him, and he was willing to part with them. I didn't pay attention to the price or worry about driving it down, because whatever Kim wanted to charge me was fine with me. I figured that he worked out the best possible price for him as a cacao farmer. And I had already tasted the beans on the farm, so I was willing to pay whatever he asked.


Crayfish Bay's beautiful cocoa beans.

When I got back to my commercial kitchen in Canada, I applied a fairly light roast to the beans and then created an 80% dark chocolate. With the level of acidity and fruity flavours the beans naturally had, I found it a bit too bitter, so I took half the batch and created a 70% dark chocolate. The fruit flavours really shined with the increase in sugar, and plum, grape and blackberry flavours seem to be at the forefront, with some citrus, earthy and chocolaty notes. I love my little supply of these Crayfish Bay bars. I am so sad that there are only 11 bars left! Oops, make that 10. I ate one while writing this post.

The chocolate bars I made from Crayfish Bay's cocoa beans.
The entire stock is just for me! Well, I've shared a few...


Craft Chocolate Makers Often Support Each Other, But Crayfish Bay Takes it to a New Level

Kim and Lylette are hoping to inspire other young Grenadians to farm cacao. "We are hoping to set up apprenticeships for young Grenadians who have access to lands and are seriously interested in cocoa." They are thinking about apprenticeships that would last 2 to 3 months and would cover every stage from planting young trees to producing chocolate, including the self construction of buildings and machinery to keep capital costs down. They also want to encourage people to work together as groups to avoid taking loans. Kim and Lylette are still working out the details, but this would go a long way to helping young farmers to get involved in growing cacao, and keeping the profits on the farm by making chocolate from tree-to-bar.


Cocoa pods opened, emptied and nestled into the
trees on Crayfish Bay Organic Estate.
Farming cacao requires collecting wet beans
(with pulp still attached) and bringing them in at the
end of each day to begin the fermentation process.


Crayfish Bay is all about Ethical Business Practices
Kim has given complete control of the land to some of the poorest local people who receive 90% of the highest price available for the wet cocoa and green Nutmeg they pick.  All other crops that they plant belong entirely to them, which they feed their families from and sell in the local market. According to Kim, "this has had a huge impact on their income and also raises self esteem." The other 10% of the price goes to land taxes and capital costs.

The coal used to roast the cocoa beans is also purchased within the community. Kim and Lylette explained, " We buy in bulk, but at regular retail prices, which also has a huge positive impact on some of the poorest people and also keeps the corporates out of the loop." Their goal is to entirely support the Grenadian locals, and not the type of large corporations that move in and care more about tourist-generated profit on a tropical island like Grenada.
 

One of the cacao farmers cutting the cocoa pods
from the trees at Crayfish Bay.
As far as their strong beliefs in growing organic cacao, they say, "We believe that 'organic' goes way beyond what you eat, but is rather a state of mind where we see the planet and everything that depends on it, including us, as one living organism. If we look after each and everything,including each other and the billions we will never meet, we look after ourselves.......therein lies the profit....".  These are the best kind of cacao estate owners and chocolate makers.


Where can you buy Crayfish Bay Organics Chocolate?
A family company in the UK called 'Lick The Spoon' has just started selling Crayfish Bay Organic chocolate bars online, which is Crayfish Bay's first international retailer. In Grenada, you can find the chocolate at a couple of major hotels, and some boutique hotels like True Blue Bay Resort, and in the  'House of Chocolate', which is in St. Georges. Other locations include: 'All Things Nutmeg' , which is in the GCNA mall on Kirani James Boulevard and 'The Market Place' which is located in Port Louis marina. The company is also in the midst of organizing export to other Caribbean Islands, so watch for this chocolate on your next vacation!


As for the beans, you can still taste those in Pump St. Bakery's Crayfish Bay chocolate bar. They are the only chocolate maker allowed to purchase the beans at this time. Otherwise, you'll have to go to the farm in Grenada yourself to pick up a bag. Kim plans to use as may of his beans as possible in his chocolate.

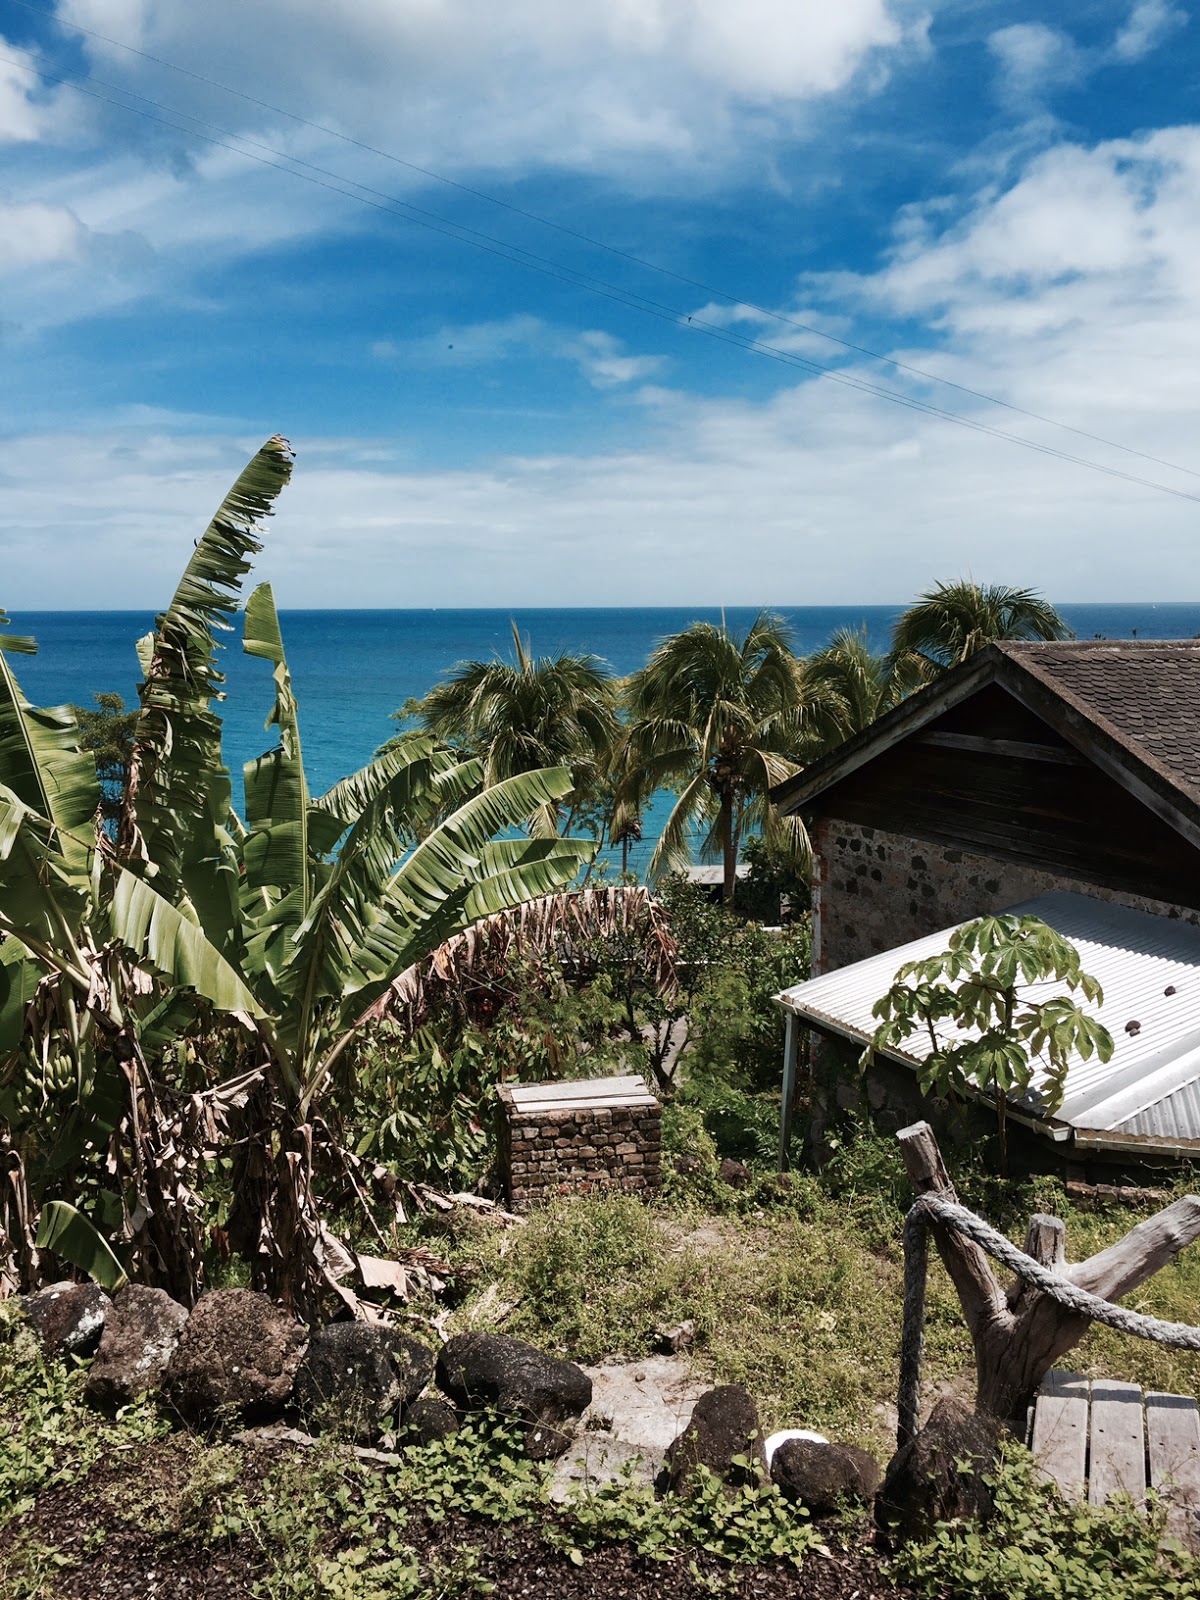
Where can you stay at Crayfish Bay?
Kim and Lylette have awesomely built a 'Little House' which is listed on airbnb. It is set up on the hill overlooking the bay. There are two bedrooms that you can close up, and a lovely covered outdoor kitchen and patio area for sitting, relaxing and enjoying the surroundings and smells of fresh cacao,  mangos and other tropical fruit.  


The view from the 'Little House' at Crayfish Bay.

You can choose to pay additional to eat with the owners each night (from what I hear, Kim makes delicious fish dinners most nights), or you can buy your own groceries, or eat out on your own. I think you can even follow the farmers around to learn how to be pick cocoa pods from the trees and prepare the beans for fermentation, and perhaps Lylette will show you how to make chocolate. I spoke with two guys from Quebec who were staying in the Little House at the time of my visit, and they did all those things and had a fantastic time. It seems like a truly an amazing tree-to-bar chocolate experience.

Learn more about the 'Little House' on Crayfish Bay's website: http://www.crayfishbay.com/.

So get moving and plan your next vacation to Grenada! Crayfish Bay's 'Little House' is waiting for you!

***

This is the many faces of me in Grenada...see how happy I am? I can't wait to get back there someday.

Tuesday, August 15, 2017

Help! My Chocolate Has Melted Part 2: Has my chocolate gone bad?

When you purchase chocolate, you truly want it to be in perfect form. But there are times when you arrive home from the store or your vacation, and your chocolate looks less than perfect when opening it. There are several reasons why your chocolate might look bad, or even moldy, when in fact it is not 'bad' or 'moldy'.

Did you open a new package of chocolate and it looked like this?
This chocolate has not gone bad, it has unfortunately 'bloomed'.
It was made in Trinidad and purchased at the Trinidad airport,
and could have bloomed at the chocolate maker's shop or in transport,
since temperatures are regularly over 30 degrees Celsius in that country.
This chocolate can be re-tempered and 'saved'.

The chocolate has come out of temper, or was never tempered properly in the first place. If the chocolate has a white film on it, this is not mold (or mould as we might say in Canada or the UK) it is 'bloom'; either fat bloom or sugar bloom. This film can have occurred in one of three ways:

1. The chocolate was either not tempered by the manufacturer in the first place, which may be an indication of quality, because it truly is a scientific process of ensuring the correct crystals are formed during melting, tempering and the setting of the chocolate. So the bloom either occurred immediately and was packaged regardless by the manufacturer, or it was seeded with unstable cocoa butter crystals which then transformed to a higher level of crystal over time, so it bloomed some time after it was packaged, which shows on the surface of the chocolate bar.

2. The chocolate is exposed to humidity - either before packaging, with improper packaging, or after it has been opened and exposed to humid air. The bloom in this case is sugar bloom. I have had this problem when trying to make chocolate too late in the summer/Spring season - even when the dehumidifier is running all day!

3. The chocolate has been exposed to heat and fat bloom occurs. This often happens when traveling, or when chocolate is left in the car, even for a few minutes while you are running errands. The temperature in the car can reach 30º Celsius rather quickly once the air conditioning is turned off, and chocolate should be stored in a cool dark place at temperatures of about 18º Celsius to 21º Celsius.

This is a block of cocoa butter or cocoa 'fat', so you can see how the chocolate
would get light-coloured streaks or spots on it when fat bloom occurs.
It is simply the fat rising to the surface of the chocolate.

What to do about bloomed chocolate?

You have two options:

Do nothing: If you are not picky about slight taste differences in your chocolate, you can just eat it as is, or melt it down and put it in brownies, or chop up and use it as chocolate chips in your next batch of cookies.

Temper it: If you paid a lot for your chocolate and really were in it for the natural origin cocoa bean flavours, I recommend you melt and temper the chocolate. It is easy - just follow the instructions at this link: http://ultimatechocolateblog.blogspot.ca/2014/04/there-is-more-than-one-method-to-temper.html. Also, read Part 1 of Help! My Chocolate Has Melted by clicking here for a quick microwave method for melting and tempering your chocolate.

Stay Tuned! An 'EZ' way to temper your chocolate, coming soon to the blog...

I want to tell you how I've been tempering chocolate for the last year. I have the perfect tool to temper chocolate quickly and efficiently, so if you are starting a chocolate-making or chocolatier business, you'll want to stay tuned for this article.

Friday, July 28, 2017

Summer, Spring, Fall, Hello Cocoa has them all!


I eat a lot of basil. It grows in the backyard garden in the summer. I grow it in pots on my veranda. I also grow it indoors the Aerogarden in the winter time. More often than not, I eat it directly from the plant. I add it to my pasta sauce and make salad dressing from it. And although I have thought about it A LOT, I have not yet added it to chocolate.

So my first taste of basil in chocolate was when I tried Hello Cocoa's 'Spring Fever' chocolate bar. This Arkansas-based chocolate maker has combined dried basil, with basil olive oil and apricots and added them to a 57% dark chocolate.


I thought it might be too sweet before I tasted it. I am, after all, quite used to consuming 70% to 100% dark chocolate on a daily basis. But the sweetness seemed to bring out the basil flavour, while not making the chocolate taste like 'garden herbs'. The sweet and chewy apricot also complimented the flavour. The combination was surprising and lovely, especially since the basil is now growing in pots outside and the anticipation of the herbs in the garden is at an all-time high (we have a late growing season here in Northern Ontario, we are still waiting on, well, everything).


Hello Cocoa's Spring Fever chocolate bar has inspired me to create some truffles this summer out of basil. Stay tuned for recipes!

Hello Cocoa also makes a variety of other chocolate bar flavours, including the lightly creamy Mocha bar with dark chocolate tendencies. It has 52% cocoa solids, and a slightly bitter chocolate taste with a lightly sweetened coffee flavour. The Ooh La Lavender chocolate bar was very floral in its aroma and, well, had a strong lavender flavour. Lavender is not a flavour I enjoy, but the flavours and sweetness were well balanced and the honey flavour stood out. There was also a nice cacao nib crunch from small bits of cocoa nibs tossed into the chocolate's mix. I could see how anyone who likes lavender would love this chocolate bar.


As for the single origin dark chocolates, the 70% Dominican Republic origin chocolate has bright fruit flavours and is quite nice as a dark chocolate. I really enjoyed this bar! The Venezuela 74% dark chocolate has little fruit flavour, and is on the cream and nut side of the spectrum when it comes to chocolate origin flavours. It was true to the Venezuela origin: creamy and perfectly balanced in flavour. The Uganda origin chocolate was much sweeter with 57% cocoa solids, and had a nice flavour balance (it tasted much like a good semi-sweet chocolate chip!).

A cool thing about Hello Cocoa is that they cover all three main bean types in their origin chocolate.  Their Uganda chocolate is made from Forastero cacao, their Dominican Republic chocolate is made from Trinitario-type beans and the Venezuela chocolate is from Criollo beans.

Hello Cocoa also sent me some yummy truffles, which is a new product for them, and a new 75% Haiti origin bar. I ate this bar so quickly because it was beyond delicious.


More About Hello Cocoa Chocolate...

The founders of Hello Cocoa are Preston Stewart and Lauren Blanco. They launched in August of 2014 in Fayetteville, Arkansas, with a passion for single origin chocolate and also seasonal flavours. Their first seasonal chocolate bar was released at that time, called Hello Fall, but has since been renamed to Harvest, and contains toasted pumpkin seeds, dried tart cherries and pumpkin spice and is still their best seller to this day.

Learn more about Hello Cocoa on their website at: www.hellococoachocolate.com or on Instagram: @hellococoachocolate.